Building a Chrome Extension with Flutter
Chrome extensions are small software programs that can modify and enhance the functionality of the Google Chrome browser. In this article, we’ll walk you through building a simple Chrome extension with Flutter for web.
Choose a Purpose
Before you build your extension, you need to determine what you want it to do. Some popular extensions include ad-blockers, password managers, and customization tools. Choose a specific goal for your extension and stick to it as Chrome also has a single-purpose policy, do ensure your chrome extension is built to do one thing, see here.
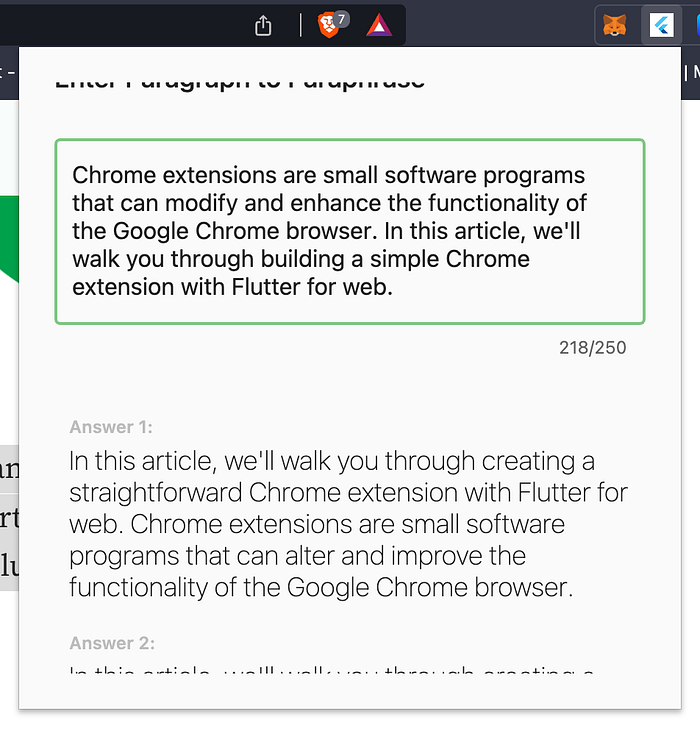
In this article, we will be building a small extension that enables you to use Quillbot in any browser tab without going to the webpage.
Set up the Development Environment
lib
├── core
│   ├── model.dart
│   └── providers
│       └── api_provider.dart
├── main.dart
├── views
│   └── home.dart
└── widgets
    └── touchable_opacity.dart
web
├── favicon.png
├── icons
│ ├── Icon-192.png
│ ├── Icon-512.png
│ ├── Icon-maskable-192.png
│ └── Icon-maskable-512.png
├── index.html
└── manifest.jsonThis is the tree structure of our project, we would also be modifying the /web bit of our flutter project as follows.
Creating the Extension
• index.html
The first thing to do will be to replace the default flutter index.html code with this one as we will not be needing service workers or the new flutter.js implementation.
<!DOCTYPE html>
<html style="height: 450px; width: 450px">
  <head>
    <meta charset="UTF-8" />
    <title>chromextension</title>
  </head>
  <body>
    <script src="main.dart.js" type="application/javascript"></script>
  </body>
</html>
Note: you can modify the popup height and width here my changing it in the <html> tag.
• manifest.json
Secondly, we will be replacing the manifest with a chrome compatible one
{
    "manifest_version": 3,
    "name": "quill",
    "short_name": "quill",
    "description": "A quillbot chrome extension",
    "version": "1.0.0",
    "host_permissions": [
        "https://*/"
    ],
    "content_security_policy": {
        "extension_pages": "script-src 'self' ; object-src 'self'"
    },
    "action": {
        "default_popup": "index.html",
        "default_icons": {
            "16": "icons/Icon-192.png",
            "32": "icons/Icon-192.png",
            "48": "icons/Icon-192.png",
            "64": "icons/Icon-192.png",
            "512": "icons/Icon-512.png",
            "192": "icons/Icon-192.png"
        }
    },
    "icons": {
        "16": "icons/Icon-192.png",
        "32": "icons/Icon-192.png",
        "48": "icons/Icon-192.png",
        "64": "icons/Icon-192.png",
        "512": "icons/Icon-512.png",
        "192": "icons/Icon-192.png"
    }
}
The manifest.json file is a required file for every Chrome extension and contains important information about the extension. It acts as a configuration file that tells Chrome how the extension should behave.
Here’s a brief explanation of the fields in the example manifest file:
manifest_version: This field specifies the version of the manifest file format. The value should be set to 2.name: This field is the name of the extension that will be displayed in the Chrome Web Store and the browser's extension list.version: This field is the version number of the extension. You can increment this number each time you update your extension.description: This field is a brief description of the extension and its functionality.action: This field specifies the properties for the browser action, which is a button that appears in the browser's toolbar. In this example, thedefault_popupproperty specifies the HTML file that will be used as the popup window when the browser action is clicked.host_permissions: This field is an array of strings that specify the URLs that the extension has access to. For example, if your extension needs to access data fromhttps://example.com, you would add"https://example.com/*"to thehost_permissionsfield.content_security_policy: This field is used to specify the Content Security Policy (CSP) for the extension. The CSP is used to control which sources of content are allowed to be loaded into the extension's pages. For example, if you only want to allow content from your domain to be loaded into the extension's pages, you could setcontent_security_policyto"default-src 'self'".action: This field specifies the default action to be taken when the extension is installed. For example, you could set"action": "newtab"to have a new tab page opened when the extension is installed.
Note that these are just a few of the many fields that can be included in the manifest.json file. The Chrome documentation provides a complete list of the fields that can be used in the manifest file, along with their descriptions and example values.
Creating the Dart API Request
Here we create the API provider that would be making the network request in our extension
Next, we create the UI for the extension, which consists of text and a text field that makes an API call once a text change happens and brings out multiple paraphrased versions of the text inputted.
Building and Testing
flutter build web --web-renderer html --csp --dart2js-optimization=O4Here is a breakdown of the command I use to create chrome extensions, which is the one mentioned above:
The
flutter build webcommand is used to build a Flutter web project. It tells Flutter to compile the project to be run in a web browser.The
--web-renderer htmloption specifies that the project should be compiled with HTML as the renderer.The
--cspoption enables Content Security Policy (CSP) mode. CSP is a security feature that helps prevent cross-site scripting (XSS) and other code injection attacks.The
--dart2js-optimization=O4option sets the optimization level for the Dart to JavaScript compiler. TheO4value specifies the highest optimization level and can result in faster code execution and smaller JavaScript code size, but also longer build times.
Test your Extension
To test your extension, you’ll need to load it into Google Chrome. To do this, follow these steps:

- Open Google Chrome and go to
chrome://extensions/. - Enable Developer mode by clicking the toggle switch in the upper-right corner.
- Click the “Load Unpacked” button and select the directory where your extension files are located.
- Your extension should now be loaded and visible in the browser.
Publish your Extension
After testing your extension and making any necessary modifications, you can publish it to the Chrome Web Store by following these steps:
- Create a developer account on the Chrome Web Store.
- Create a zip file of your extension’s files.
- Upload the zip file to the Chrome Web Store.
- Fill out the necessary information, such as the name, description, and icons for your extension.
- Publish your extension and make it available to the public.
In conclusion, creating a Chrome extension is a simple process that only requires a foundational understanding of programming.
Also here’s the project on GitHub.